How to contribute to the cyberatuc.org website
Table of Contents:
The basics
This site is deliberately set up to be easy to hack on. If you know how to write in Markdown and make commits in Git, you can probably contribute to this website.
To get started, you’ll first want to go through the installation process shown on the readme on GitLab, and make sure you can build and test the site and that everything loads correctly when you view it in a web browser.
See Jekyll’s website for documentation of the most basic stuff. In particular, the Directory structure page is very useful for figuring out where everything is.
Markdown
Blog posts and simple content pages on this site are written in Markdown, a very simple markup language. This is used in Reddit posts, GitHub readmes, etc, and is generally pretty easy and intuitive to figure out. You can learn how to use it with this interactive tutorial. There’s also this useful cheatsheet if you just want a quick reference guide.
More advanced users might want to know that we are using the GitHub-Flavored Markdown (GFM) variant of Markdown, which adds some features like tables. We are also using kramdown to render the HTML, which provides a number of additional features such as table of contents generation, LaTeX math blocks, and more. You might want to check out the kramdown syntax documentation for info on these advanced features.
Links
If you want to link to another page on the website, please do not hardcode the domain name “cyberatuc.org”—doing so will cause problems with viewing the website locally and create a nightmare if we ever change the website’s domain name. Instead, use this special variable: {{ site.url }}. Here’s an example:
WRONG: Check out [our blog](https://www.cyberatuc.org/blog/)!
RIGHT: Check out [our blog]({{ site.url }}/blog/)!
For advanced users: This is an example of a Liquid variable (Liquid is the name of the template language that Jekyll uses). You can find a lot more variables in the Variables page of Jekyll’s docs.
Images
If you are going to host an image here on the website, we have a prebuilt template you should use to embed it (which will automatically take care of a bunch of tedious crap for you). Place your image in the _assets/img/ directory with a descriptive filename, using dashes in place of spaces (if it belongs to a blog post or other dated content, please begin the filename with the date in YYYY-MM-DD format). Then you can use this code to include the image in your post:
{% include image.html src="my-file.jpg" alt="Text to be shown if the image fails to load" caption="Text to be shown directly below the image" %}
You can remove the alt or caption options if you don’t need them.
YouTube videos
To embed a YouTube video, simply use this code:
{% youtube "https://www.youtube.com/watch?v=dQw4w9WgXcQ" %}
Author/member information
If you want to be listed on the members page, or if you are going to write a blog post, you need to add your basic information to the site’s author list. Once you’ve done that, you may also add a photo of yourself or add yourself to the members page.
Adding your basic information
First, edit the _data/authors.yml and add an entry for yourself. If you are a UC student, your entry should look like this:
doejo:
  name:     John Doe
  position: President
  twitter:  johndoe
Where the example uses doejo, you should use your UC username (i.e. your @mail.uc.edu address). If you aren’t a club officer with an official title, you should remove the “position” line. If you don’t have a Twitter or don’t wish to share it, you can remove that line as well.
If you are not a UC student, you should instead use ~[last name][first name] as your username, and you should also include an alternative email address (since you don’t have a UC address). Here’s what your entry might look like:
~doejohn:
  name:     John Doe
  twitter:  johndoe
  email:    jdoe@example.com
You’re all done! If you want to add a photo or add yourself to the team page, read the other sections below.
Adding a photo of yourself
If you have a high-quality headshot of yourself, you may want to add it to the website as well. You will need to crop it to match the other photos, and then save it with a particular name and location.
Open your photo in your favorite image editing software to crop it to the right shape. Your photo needs to be a square with your face centered in it. You need to crop it such that your face takes up precisely 60% of the width of the image. Depending on the shape of your head and the angle of the photo, you may exclude a little bit of your hair or ears when judging what 60% is. You also need to save the image as a JPEG.
I recommend cropping the photo in GIMP using the Rectangle Select tool. In the tool options, turn on ‘Fixed: Aspect ratio’ and type in a value of ‘1:1’ (this will force it to crop to a square). Also in the tool options, enable ‘Highlight’, and set it to ‘Rule of fifths’ (this will give you guidelines so you can make sure your face is precisely 60% of the image width). Once you’ve properly selected your face, select Image>Crop to Selection, then export the image as a .jpg file.
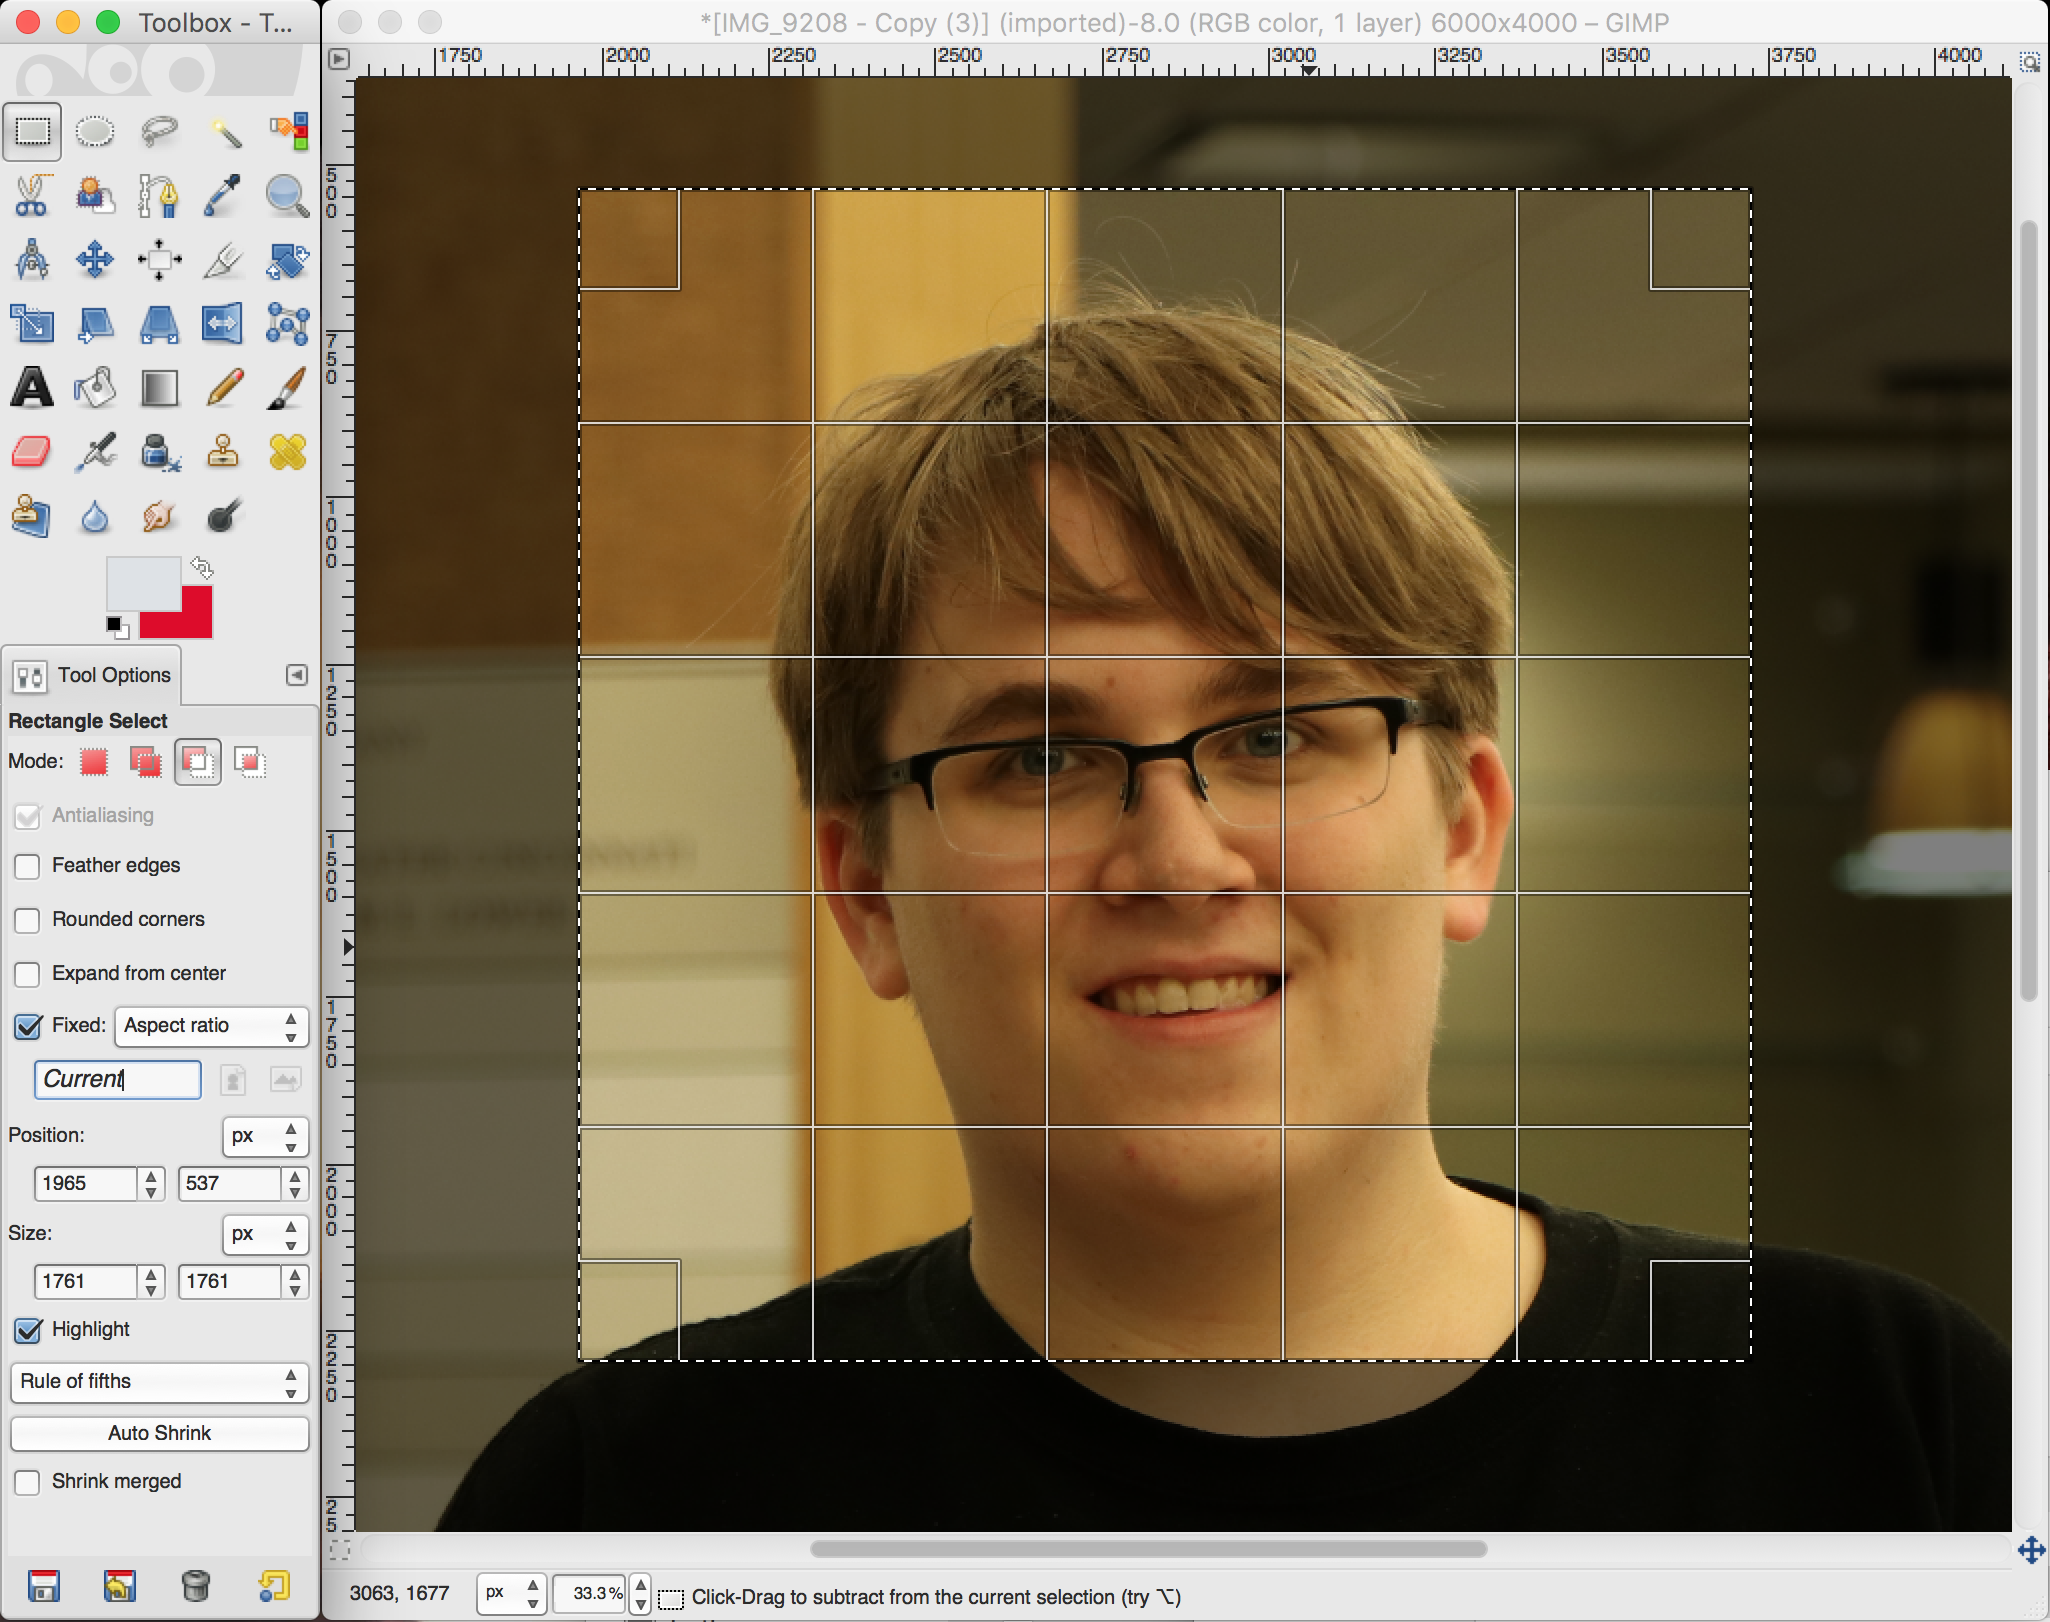
How to crop your headshot using GIMP
Once you have your properly cropped photo, rename it to “avatar-doejo.jpg” (replacing “doejo” with your username as it appears in authors.yml) and put it in the _assets/img/ directory. If you’ve named it correctly, the website will automatically find it and associate it with your username.
Adding yourself to the members page
If you want to appear on the About page in the team section, you will need to add yourself to the _data/team.yml file. This file has an executives list for club officers, and a members list for everyone else. Simply add your username to the list you belong on. Be sure to keep the list in alphabetical order by last name.
Blog posts
This site uses Jekyll’s blog post system, so you may want to read this help page from Jekyll’s documentation: Writing posts.
Basically, blog posts are saved as Markdown files in the _posts/ directory. At the top of the file is the YAML Front Matter, which sets a few properties for the page (e.g. title, date, author, etc), and then the rest of the file is just pure Markdown. I recommend simply looking at the existing posts in that folder and copying from them to create new blog posts. Here’s a bit of an explanation for each of the properties in the front matter:
layout: This defines what type of page this is; this should always bepost.categories: The categories show up as part of the page’s URL, so please do not change this value fromblog.title: The title for this post that shows up at the top of the page and in the browser’s tab name. It’s pretty self-explanatory.author: Username of the author. If this is your first time writing a blog post for the site, you’ll need to add an entry for yourself in the_data/authors.ymlfile (see the section above on authors/members for instructions).date: Should be the approximate time you plan to publish the post (but don’t set it in the future—some RSS readers might be freaked out by that)
Meetings
Unique to the Cyber@UC is the _meetings folder, which stores the pages for every meeting in the meetings archive. Meetings are implemented as a Collection in Jekyll, which you can read more about here.
To create a new meeting page, create a new Markdown file in the _meetings/ folder and format it just like the other <number>.md files there. Put the slides PDF at files/slides/meeting_001.pdf (replace 001 with your meeting number). If there are no slides for whatever reason, add meeting_slides: false on a new line in the YAML front matter in your .md file.
Advanced site development
If you are going to work on the site’s design or adding features or whatever, here’s some pertinent info you might need.
One quirk of this project is that we use jekyll-assets instead of Jekyll’s built-in asset management, so if you are embedding an image/script/stylesheet/etc, it might be a little bit different than what Google will tell you. See jekyll-assets’ docs at that link (or just look at some of the existing pages and copy from them).
The theme for the site was built from Jekyll’s default theme, minima. However, it has been heavily modified to use Bootstrap 4 (a framework for layout/components/etc). We also use Font Awesome 5 for icons, jekyll-seo-tag for metadata tags, and a couple other plugins for this and that (see the Gemfile or the build settings in _config.yml). Be warned: Bootstrap 4 and Font Awesome 5 are both relatively new versions of that software, so a lot of the info on Google might still be for the previous version.